Showing posts with label tutorial. Show all posts

4.23.2011

Heart-shaped-strawberry-pink-ice cubes.

This is a sort of tutorial. I mean really you probably don't need a tutorial to make ice cubes with fruit, but humor me if you will, I felt like a genius for doing this!

Last weekend was my stepson and daughter-in-law's baby shower for Carlee Claire who will be here soon! I helped with said shower and was in charge of punch, decor, and tableclothes. Well, not only did I get a little crafty with the decor (enter tissue paper pom-poms) but I decided to jazz up the sherbet punch.  I chose raspberry by the way so the punch would be girlie and pink!

I had some strawberries on hand and thought I could make some ice cubes for the punch for a little added fun.
Wasn't wanting to use ice cube trays as that would be boring (plus I didn't have any) so I opted for a muffin tin.

Told you I was genius!

I then decided the ice cubes needed a little color so I went digging for some food coloring to mix with water...then it hit me....pink lemonade!   Which I didn't have on hand, but I did have these Crystal Light pink lemonade packs that you mix with a bottle of water.

Shazam! pink ice cubes!


Thought if I cut the strawberries just right they would resemble hearts. 
(these would be cute for a Valentine dinner or banquet too, don't you think?)


So I added a heart-shape slice and added a little lemonade - 
I probably filled up my tins one-third or so. 


I put my tin in the freezer and waited till they were frozen. 

Then voila....I had my sweet little pink strawberry ice cubes! 


They popped out of the muffin tin super easy and I just stored them in a plastic dish in the freezer. 

Little strawberry hearts frozen in pink! Can you get any more girlie and sweet? 


And here is the final product...pink sherbet punch for a pink girlie baby shower! 
The ice cubes ended up in the cups and were a nice surprise for guests
Oh, I didn't mention this is served in my Grandmother's antique milk glass punch bowl.
Thanks Mom!


How awesome did this shower look with all the delicious food, decor, friends, and family!?! 


Since a baby girl is coming into my life real soon, 
I welcome any links to other projects and baby-girlie DIY's.  
I have started a new board in my Pinterest called Baby Delights 
so I can keep all my found baby inspiration in one spot. 

Have I mentioned how much I love Pinterest? 
I do, it is the most visually inspiring thing ever!

I hope to have another cute tutorial posted soon for a simple and fun idea 
for a baby shower gift that was inspired by something I found on none other than Pinterest!

It has a cupcake theme. 
wheeeee!

6.17.2010

Nifty & Thrifty Tutorial

I'm happy to bring you this little dress upcycle that I had been thinking about for a few days after coming across some clothes hanging in my laundry room that have not been worn for several years and were due to either go to the benevolent clothing room or the trash can!

However, I have been following Marisa's blog for a couple of weeks and was feeling inspired to get my sewing machine busy and turn my proverbial trash into new treasure!

We are going to name her - ummm, how about Bertie?  

Hello Bertie, now aren't you matronly.


So here is Bertie the Beauty before I did anything besides wash her. Tag said dry clean only, but I washed on delicate and hung her to dry - a little trick I learned in my Fashion Merchandising course in college.  Sometimes manufacturers put "dry clean only" on the tag when they are too cheap to do the testing needed for laundering. 

Excuse my blurry shots - Bertie's busy pattern was not the easiest to photograph.

So first and foremost we had to remove some buttons.  I'm a button hoarder from way back and even have little containers that I keep them separated by color. (Mmmmm OCD much?)

Never miss a button opportunity, I say!


Now, let's get down to it.... I had tried Bertie on and decided I would cut off the top bodice and part of the bottom to leave a fun little summer skirt.  Actually these buttons went down low enough that I decided to leave a couple of them and use them as my new fastener for my skirt.

No sense making any more work for myself, right?

I went ahead and whacked the top bodice of Bertie off and saved her for .....IDK, I just save stuff!  You never know when you might need a piece of some random fabric for some other project, or at least that's what the voices tell me.

I had planned to cut this off about the knee and just put in a simple hem and call it good, but then after cutting it off - I had a ruffle epiphany!  {did you hear the trumpets sound?}

Here is the bottom part of Bertie that was destined to join that top bodice piece in No-Man's Scrapland.

So, I took it a step further and decided that I could cut off part of the very bottom of this scrap, put in a little gather stitch and sew it back on my skirt on for a sweet ruffle.  How clever am I?

I went ahead and turned under the raw edges of the skirt and the ruffle and put in a little finish so it wouldn't unravel and look all messy. Alternatively you can put in a tight zig-zag stitch or use your serger for a nice finish...but me and my no-serger-having self just did it the old fashioned way...but I'm not bitter or anything. 

Next step was a long basting stitch along the top part of the ruffle piece to gather in for the ruffle affect.


I will stop here and we'll visit Hindsight-land.

Looking back I would have done something differently at this point because my ruffle was just not as ruffly as I wanted. Boo.

What I could have done was cut a piece from that top bodice scrap piece and add it to the ruffle piece before gathering so there would have been more fabric to gather to add volume to my ruffle.

So here's a little math formula for you:  Ruffle + Fabric = Volume
(there will be a quiz later)


Anyway, back to Foresight-land:

So I carefully pulled the ends of the threads to gather up the piece.  Then I pinned on the ruffle to my skirt bottom, right sides together and pulled and pinned and adjusted until it was all in place.

Then it was time to sew!  Once it was sewn on I ironed the seam allowance down toward the ruffle.  I am a huge believer in utilizing my iron when I sew.  I think it helps keep the piece looking professional.  Thank you Mrs Pew! (my high school Sewing teacher)

I did take in the waist a little on the side seams so it would fit better, then I just simply finished the top raw edge and turned under, pinned, ironed, and sewed a topstitch.  If I had wanted to make Bertie's new waist have a little more substance, there are several options I could have done using elastic, some interfacing, etc, but I chose the easy route for this project.


And here is the new and improved Bertie: 

please excuse my wrinkled shirt, I had worn this to work and stuffed it in my gym bag when I changed to walk after work and pulled it back out to photograph.


As you can see, her ruffle is there, but not with a lot of volume - bummer.

Bertie is a nice, cool and comfortable little number that sits below the waist.  I am thinking she and I had a nice reaquanitance.  She will be a good go to skirt this summer!
 

I wasn't sure how the whole button thing would turn out, but I kind of like the button detail.


And Bertie may still be a little matronly with not-a-lotta volume, but by golly she will still attempt to do a little twirl every once in a while!


I think I will rename her Brazen Bertie! ;)

Okay, so tell me what you think about this tutorial...any more ideas for Bertie?  Anyone else want to try a Nifty and Thrifty project? I'd love to add your tutorial!

I have another dress that I plan to refashion in a different way so I welcome any feedback I can use for the next Nifty & Thrifty.  


Bertie is linked up over here!
Check out the other great tutorials.
Join  us Saturdays at tatertotsandjello.com for the weekend wrap up  party!

6.16.2010

root a-toot tutorial

I have a nifty & thrifty tutorial coming at you soon. 

I've become inspired by this blog: New Dress a Day
She has taken 365 days, 365 dollars to create 365 dresses...and taken an oath not to buy any traditional clothing for a year.

Clever, no?

So I am going to give this a go on a much smaller scale and maybe add a tutorial every now and then because:
Number 1: I am cheap thrifty!
Number 2: I need to either get rid of some crap clothes.
Number 3: I need to use my sewing machine so I will quite having to dust the darn thing.

So I'm hoping to bring some fun little tutorials to the blog and maybe someone else will be inspired to refurbish some of their own items.

I actually wore my nifty & thrifty number today to work.  Even got a few compliments. yay me.

stay tuned....


PS.  Don't forget about the giveaway right here!

9.24.2009

gesso+paint+rag tutorial

The thing about keeping a blog is keeping up with things in a timely manner.
Problem is, I have not had much time lately to keep things updated!

So bear with me please!

We had another horseshow last weekend: Ark-Mo Show of Champions.
Good & muddy times!
More on that later.

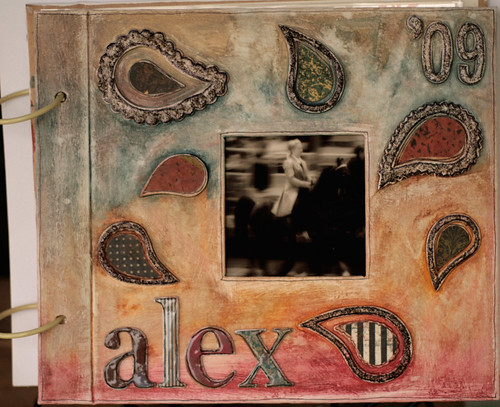
I want to post this fun tutorial that I put together with my September mini album from Crazy Daisy Kit Co. That album is awesome. I am working on the inside pages as a year end wrap up for Alex's 2009 horseshow season.

The album has a variety of pages inside including envelopes, folders, transparencies, and tabbed pages. The cover was plain kraft so I thought it was perfect for this great technique I learned and altered from the wonderfully brilliant & talented Brazilian artist, Lucy Folch during SIStv's National Scrapbooking Day blog party back in the Spring. She has such innovative ideas and I am always awed by her art.

I have modified mine a little but I must credit Lucy with the basic gesso - paint - rag technique.

So without further adieu:
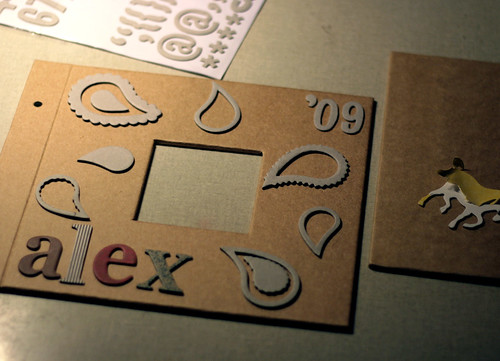
Here is the Making Memories kraft album included in the September kit, but you can also do this on a heavy chipboard or cardboard.
The key to this technique is pre-planning the layout.
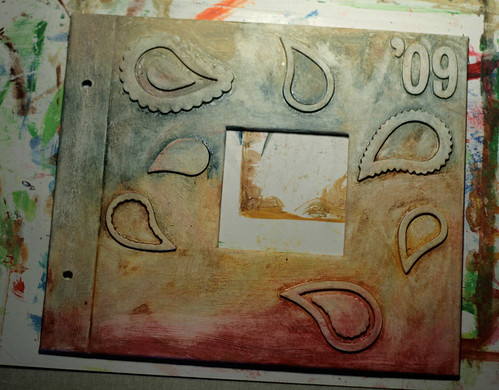
Gather some chipboard pieces and any other items that you want to include on the layout and place them where you want them.
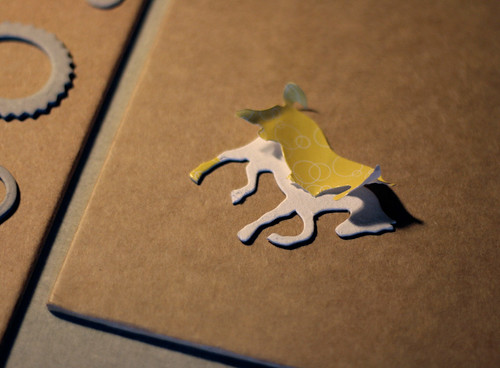
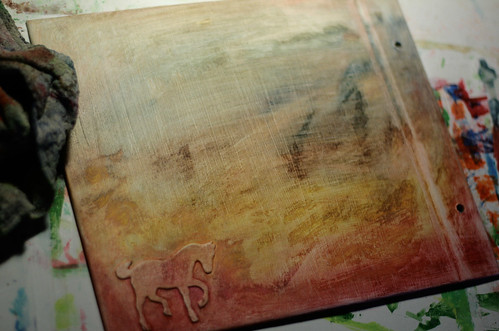
I used the cute paisley pieces in the kit, along with some other pieces from my stash. Since this is going to be an album for Alex's end of season horse shows for this year,I wanted to use the horse piece I had from Martha Stewart, but I peeled off the slick pattern from the top so my gesso will adhere. I put the horse on the back of the album.
Next, since I want to add some pieces of patterned paper to my finished project, I need to measure and cut those out before adhering my chipboard. I also made a quick sketch of my layout and numbered my pieces to correspond with my cutout paper for easy placement later.
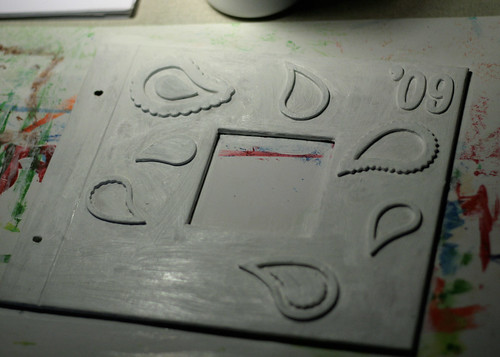
Once I have my layout how I want it, I start gluing down all my chipboard pieces. I did not glue the word "ALEX" down yet because I want to use those awesome 7Gypsies letters as they are. After the glue is dried completely, cover the entire project in gesso. Get it in every crevice and corner of the chipboard pieces. I use a smaller dry brush to get any excess out of those same crevices and corners.
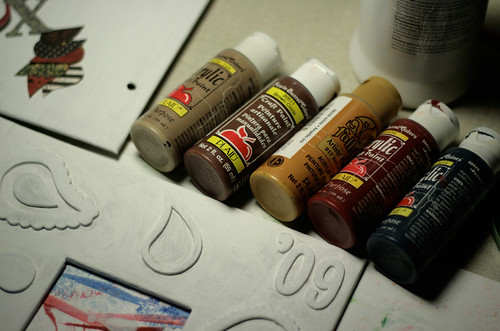
Now let the gesso dry completely while picking out four or five colors of acrylic paint to coordinate with the paper and other pieces.
This is the really fun and messy part of the project - let your creativity run wild!
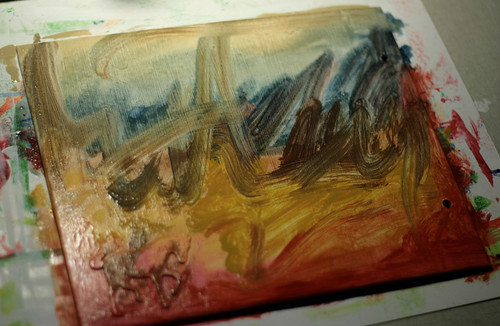
You will need to use a thin consistency with the paint, you may want to experiment on a scrap piece of chipboard or cardboard first. I began on one side and worked with a color then switched to my next color and so on to blend each color together. Just keep working with the paint until satisfied. Don't worry, it won't be perfect!
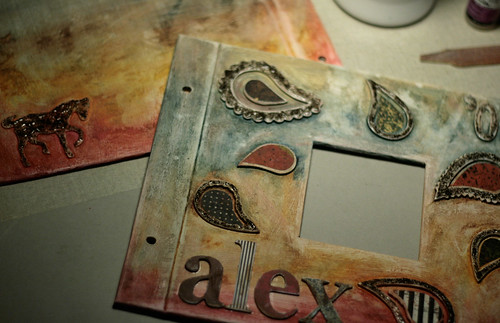
Next take an old rag while the paint is still wet and wipe and dab the project to remove some of the paint. If you remove more than you want, just add more paint. If the paint gets too dry, wet your rag - this method is mistake proof!When you are happy with how it looks, let this part of the project dry. You might want to add some glimmer mist or another mist of choice to jazz it up.Once dry, you can add on everything else. I distressed my pattern paper and glued it down. I also distressed my chipboard letters with a small emery board and some paint and glued those down.
As an afterthought I decided to use the Stickles that were included in my kit, and I love how they look on this project!
Once that dried, I got my Sharpie out and outlined, added a photo in middle and used some Ranger Glossy Accent that I had in my stash on the word "ALEX" so it would have some shine to match where I used the Stickles.

The album is now finished and ready for my pages to be done inside!